Concept
Moving when you are only moving via normal, DTM, or TWM is fairly straightforward. Movement when you switch between TWM (or DTM) and normal movement during the turn is … complex. If you do this several times in a turn, it gets even worse.
C5.20 is imprecisely worded. This tweaking should be more clear: You may not move more than 12 hexes a turn via TWM (HYW (C6.0) and WORM (C7.0) are limited by their respective rules), → nor may the TWM movement ordered require moving more than 1 hex per segment (this can happen when HPM is available or with squadrons of ships with only outstanding crews). ← The text in the arrows is implied but not clearly stated and may trip some readers up.
What the rule is saying is (C4.10 also applies and influences things):
- If you are switching from normal to DTM/TWM movement-
you move on the normal segments for your plotted, normal movement rate, speed (2/3/4/5/...) as expected, and then DTM or TWM moves you at up to 1 hex per segment for the rest of the turn. To determine what segments the DTM/TWM movement happens, find the row in the movement chart that has the relevant number of hexes moved left and use it, if there are multiple such rows, pick the one with the slowest speed [i.e., 11 instead of 12]).
- If you are starting with DTM/TWM movement and then switching to normal movement things are a bit more complex. In a nutshell, you find the slowest speed that lets you cover the number of DTM/TWM hexes in the allotted segments and start the turn with that. Once you switch to normal speed, you do the same (if you are only going 1 hex of normal movement, this is "1").
- In theory you can switch between normal and DTM/TWM movement 2 times in a turn (speed 3 ships), for example TWM(4)+1+TWM(4) or 1+TWM(4)+1. This is rare enough (and the precise segments you move rare enough being relevant) that we shall note that it is legal, but not give examples. A HPM ship (or one with an outstanding crew), 3 switches could happen. If an empire has a HPM capable ship with outstanding crew, it could do 5 normal moves which in turn would allow 4 switches between normal and DTM/TWM movement (1+DTM(2)+1+DTM(2)+1 for example). These extra switches are legal, but rather hard to bring about in practice so we shall skip providing concrete examples. Players that run into these edge cases can presumably use the rest of this document to figure them out.
The above is probably still kind of confusing without examples, so we will cover many of the common "in the wild" examples below where we can expand upon things without further muddying the waters with edge cases of edge cases.
Note that the language in this writeup uses "ship" interchangeably with "squadron". For simplicity, just assume that all ships are in their own squadron.
Specific Examples By Plotted Speed
Decoding the Charts
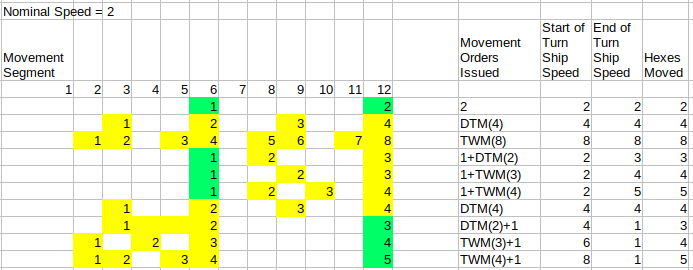
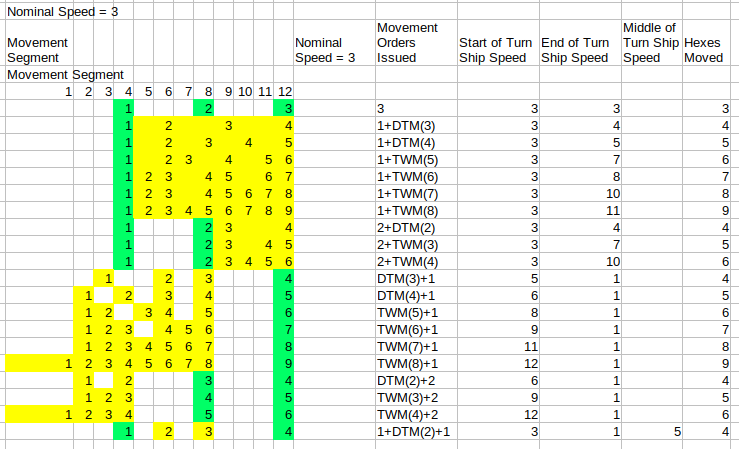
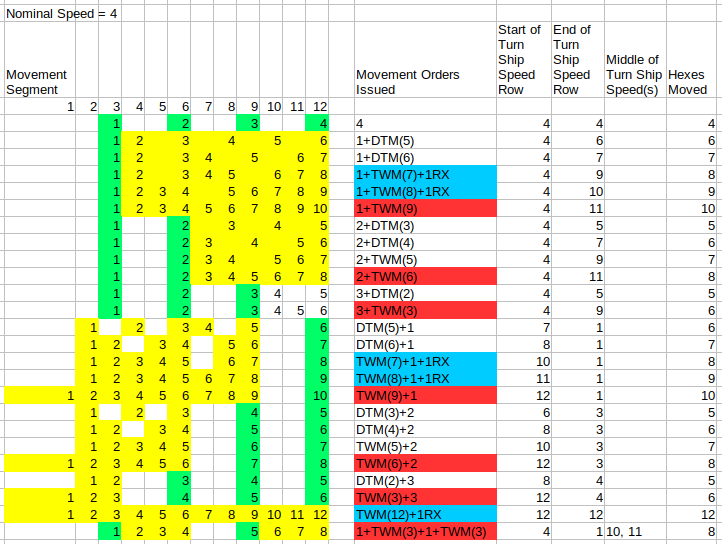
The included charts hopefully make things more clear.
- Number in green or yellow == how many hexes have been traversed so far in the turn (1 is the first, 2 the 2nd, etc.).
- Green cell == this is a move done via normal movement.
- Yellow cell == this is a move done via DTM or TWM movement.
- Red == the movement was slowed because there were more moves than segments remaining (HPM ships can only move 12, not 16 via TWM, for example).
- Blue == The ship moved slowly enough that an entire move could be used for an RX. This differs from the reds, where less than a full move was unused.
- Start of Turn Ship Speed Row == row on chart to use to use for the ship's initial move(s); This can be "interesting" if the ship starts the turn with DTM/TWM. The rules don't cover this clearly (the "Concept" section above attempts to fix this)- you have to figure this out by inference.
- End of Turn Ship Speed Row == row on chart to use to use for the ship's final initial move(s).
- Hexes moved is self explanatory.
- Movement Orders Issued should be obvious.
Speed 2
This includes your typical Romulan WE as well as a normal (SFB speed 31) ship reserving one movement point for an RX (example: 1+TWM(4)) for the WE and 1+TWM(4)+1RX for a CA would move at the same time). Faster forces could do this with more RXes.

Speed 3
This includes your common SFB ships, as well as HPM (C3.0) ships reserving one movement point for an RX. Note that the "1+DTM(2)+1" row is an example of one of the many examples where more than one switch between rates is done.

Speed 4
If you have HPM (C3.0), then this is your typical CW, DW, or FF. Many ships with an outstanding crew can also move this fast. Note that the "1+TWM(3)+1+TWM(3)" row is an example of one of the many examples where more than one switch between rates is done.

Speed 5
This is your typical CW, DW, or FF with an outstanding crew (and if the empire has HPM tech). This section is provided to confirm it exists, but is incomplete as covering all the examples gets long winded (and even more so if one covers the multiple switches between normal and DTM/TWM movement).
